GDPR: How to Add a Checkbox and a Link to the Privacy Policy in Squarespace Forms
One of the things driving us crazy about all this GDPR stuff is those pesky checkboxes on forms, although, as Caribay Camacho explains in this post, they aren't strictly necessary. Personally, I prefer to leave the subscription form without a checkbox and send a confirmation email using Mailchimp's double opt-in feature.
But everyone has their own preferences… maybe you prefer the checkbox over double opt-in, maybe you want both options to cover all bases, or maybe you prefer to use double opt-in in some cases and the checkbox in others. So, to give you some options and let you implement whichever method you prefer, in this post I’ll explain how to add checkboxes and links to your Squarespace subscription forms.
In this post, I’m going to focus solely on forms for collecting subscribers on your website. If you’re looking for general information about the changes you can make on Squarespace to bring your website into compliance with the new GDPR, I recommend that you first check out my previous post.
Table of Contents

It’s very important to note that I’m not a legal expert, so this post does not constitute legal advice. Here, I’m simply explaining how to configure certain settings in Squarespace and sharing the knowledge I’ve gained while researching the GDPR, but if you have any questions, it’s always best to consult a legal expert.
Subscription forms: What options are available on Squarespace?
First, I want to clarify that, when it comes to collecting subscribers for your newsletter, you have two options in Squarespace: the newsletter block and the forms block. Let’s take a look at the features of each and which one I prefer to use.
1. The Newsletter Section
Thenewsletter block is Squarespace's default option for attracting subscribers. I don't like this option for a couple of reasons:
The first is that it has very few customization options. You can change colors in the style editor, and not much else. If you want to customize it further, you can always do so with CSS, and if you’re looking for a simple subscription form with fields that are always visible, this might be a good option, but personally, I don’t like it for my site.
The second issue is that there’s no way to remove the last name field, so you have two options: either ask for just the email address, or you have to ask for both the first and last names—which is completely unnecessary. If you really like the look of this form block, there is a way to remove the last name field, but you’ll need to do it using CSS and a jQuery script.
However, the newsletter block has a major advantage: it is designed to allow text to be added in two different places and to make it easy to format that text.
You can easily format text in bold or italics and add links in either of the two text fields provided in this block.


On the other hand, while you can’t add a checkbox to this block, you can enable Mailchimp’s double opt-in feature in Squarespace under the “Storage” tab. This way, the subscription confirmation email will confirm their consent, and you won’t run into any issues.
2. The form block
The second option available in Squarespace for collecting subscribers is the form block. This block can actually be used to create various types of forms, although the most common ones are:
to create contact forms,
to create customer satisfaction surveys (it literally has a survey field),
to collect general information about the person filling it out (their social media accounts, their website, their preferred currency, etc.),
and to create subscription forms.
This form is more versatile than the newsletter block, and it does include the option to add a checkbox. As I explained in my previous post about Squarespace and the GDPR, we do this by adding a "Checkbox" field and marking it as "required," so that the form cannot be submitted unless that checkbox is selected.
The problem with this form was that you couldn't add links to it… I tried it a while back, and it didn't work for me. That is, until recently, when I read this post about Squarespace and the GDPR and saw that it was now working.
With this new feature, you can now include a link to your website’s privacy policy and a checkbox for consent in your sign-up form, as well as choose whether or not to enable Mailchimp’s double opt-in.
Let's take a look at how to do it step by step...
How to set up a form in Squarespace
The checkbox

As I explained in my previous post, adding a checkbox is very easy:
Add a new field to your form, of the "Checkbox" type
Change the name from “Checkbox” to “Consent” or something like that.
You can add a description if you like… something like “Please confirm that you want to subscribe” or something along those lines.
Change the text next to the checkbox to something like “Yes, I want to subscribe.”
And, very importantly, make sure to check the "required" box so that the form isn't submitted if it isn't checked.
The legal text and the link to the privacy policy
To add the legal text that must appear on the form—explaining who is responsible for the personal data, where it is stored, the link to the privacy policy, etc.—we will use another type of field within the form: the “Line” field.
Here is the step-by-step guide:
Add a "Line" field.
Call it “Privacy,” “Duty to Disclose,” or whatever you like.
In this field, you'll use the description to add your text: a legal disclaimer with a link to the privacy policy.
Uncheck the "Underline" option so that the line does not appear
If you’d like, you can go to the “Storage” tab and check the Mailchimp double opt-in option to require double confirmation (although this isn’t necessary—a single confirmation is sufficient).


However, if you just type some text, there’s no way to add a link to it. That’s why you need to include a small, simple piece of code to make it work. Let’s take a look at it now.
The code to add the link
To create a link in the text you wrote, all you need to do is add a little HTML to the text, like this:
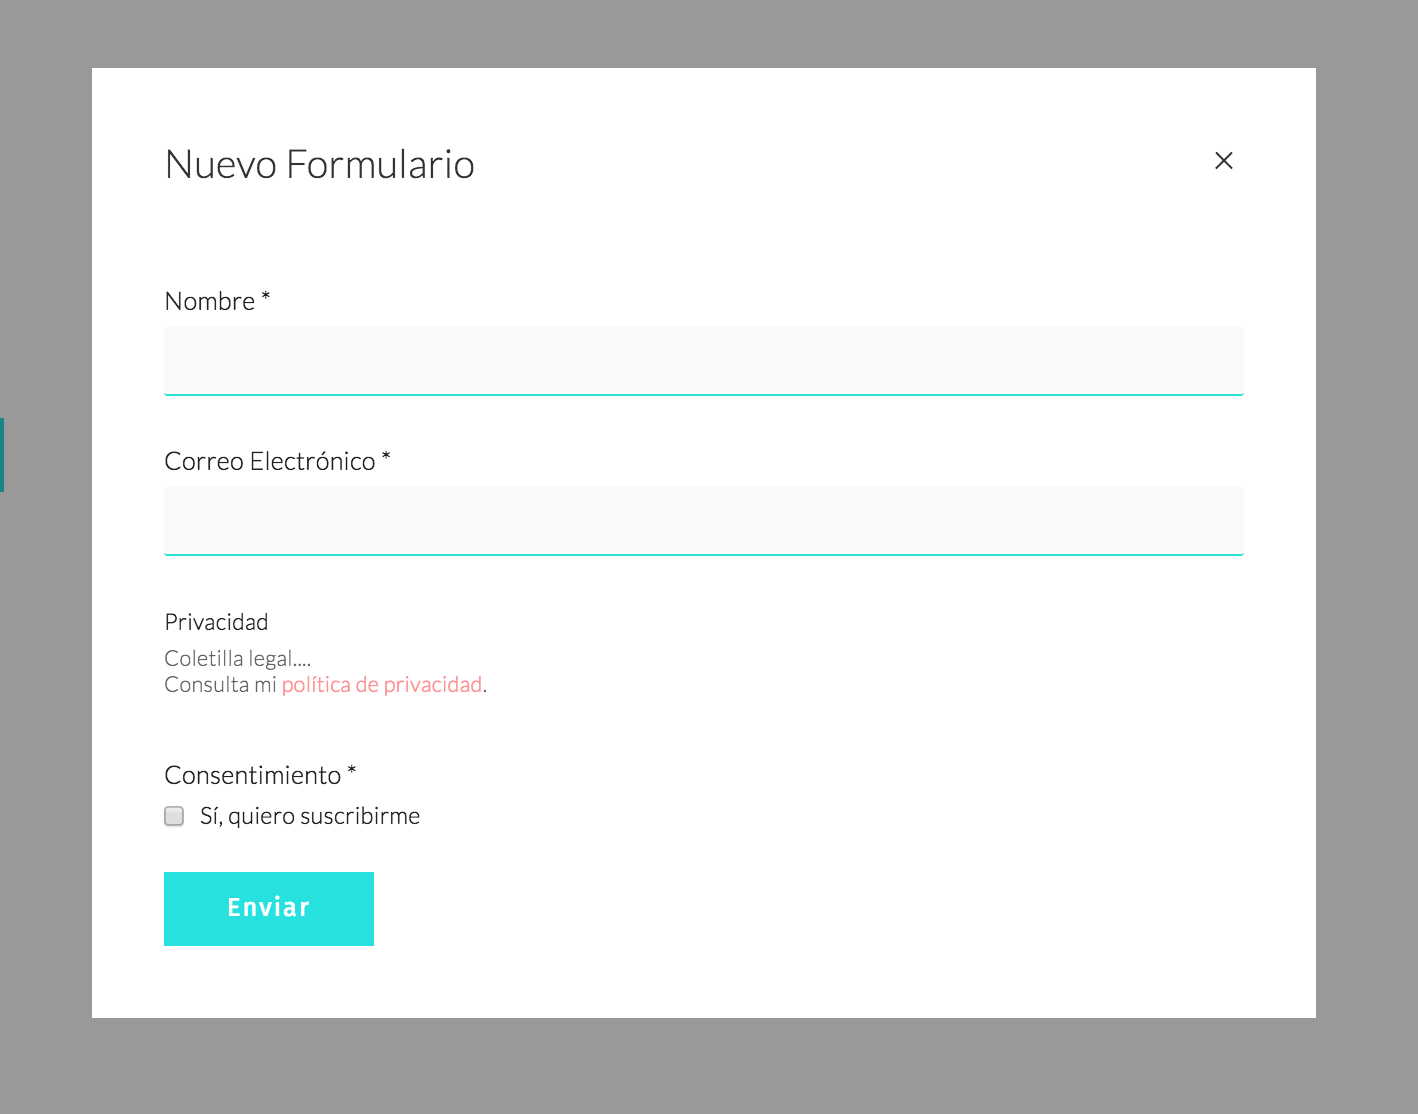
1. Copy and paste what's written below:
Legal disclaimer....
Consulta mi <a style="color:#ff6460;" href="/politica-de-privacidad/">Política de privacidad</a>.
2. And replace the following:
Legal disclaimer → replace with your legal text.
Check out my → for the text you want to include before “privacy policy”.
#ff6460 → replace this with the hex code for the color you want the link to the privacy policy to be.
/privacy-policy/ → replace this with the URL of your privacy policy.
Once you've done this and saved your changes, your form should look like this, with your text and the color you chose for your link:

If you'd prefer the form to appear as a pop-up when you click a button (rather than being embedded in the page), go to the Advanced tab and enable the "Lightbox" option. Then, only a button will be visible, and clicking it will bring up the form:

Seeing it in action: the consent form
However, none of this matters in the slightest if the consent isn’t properly recorded. In other words, what matters isn’t how you obtain the user’s consent (whether via a checkbox or a confirmation email), but rather that you actually receive that consent and that it’s recorded in some way. You can fill all your forms with checkboxes, but if it isn’t recorded somewhere, they’re useless.
So, I'm going to show you what it looks like in Mailchimp when someone signs up using that form. I just signed up, and this is what you see in Mailchimp:
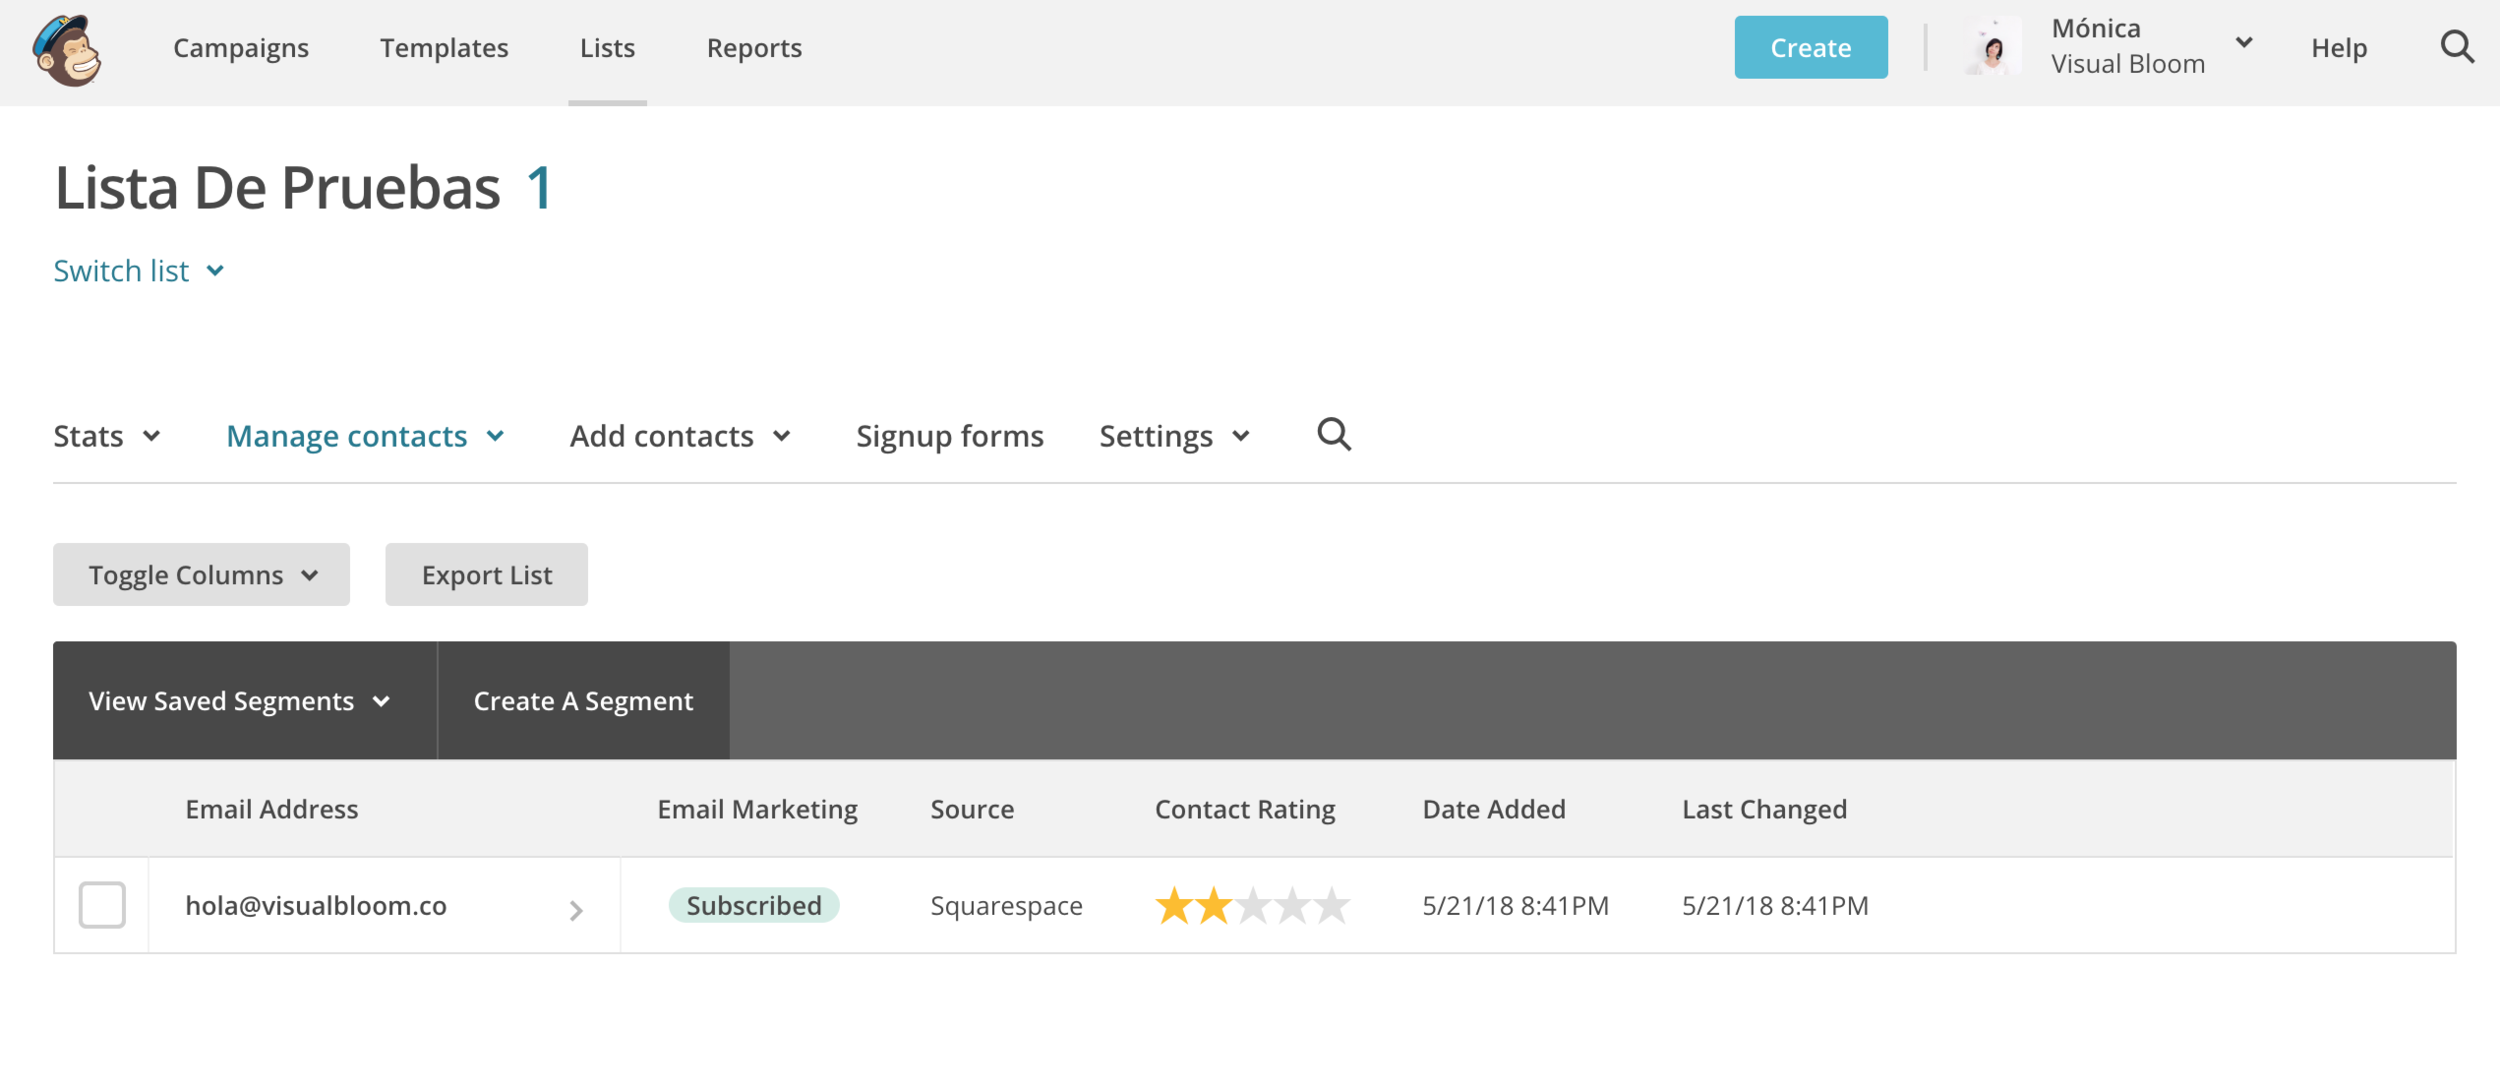
As you can see, at first glance it doesn't appear that the consent has been recorded, but it actually is there; you just need to do the following:
Go to where it says “Toggle Columns,” check the “Consent” box, and save. Keep in mind that if you named the checkbox something else earlier—for example, “Confirm you want to subscribe”—that’s how it will appear in Mailchimp. Basically, what Mailchimp does is register the field you created in the form and create a column with that name.
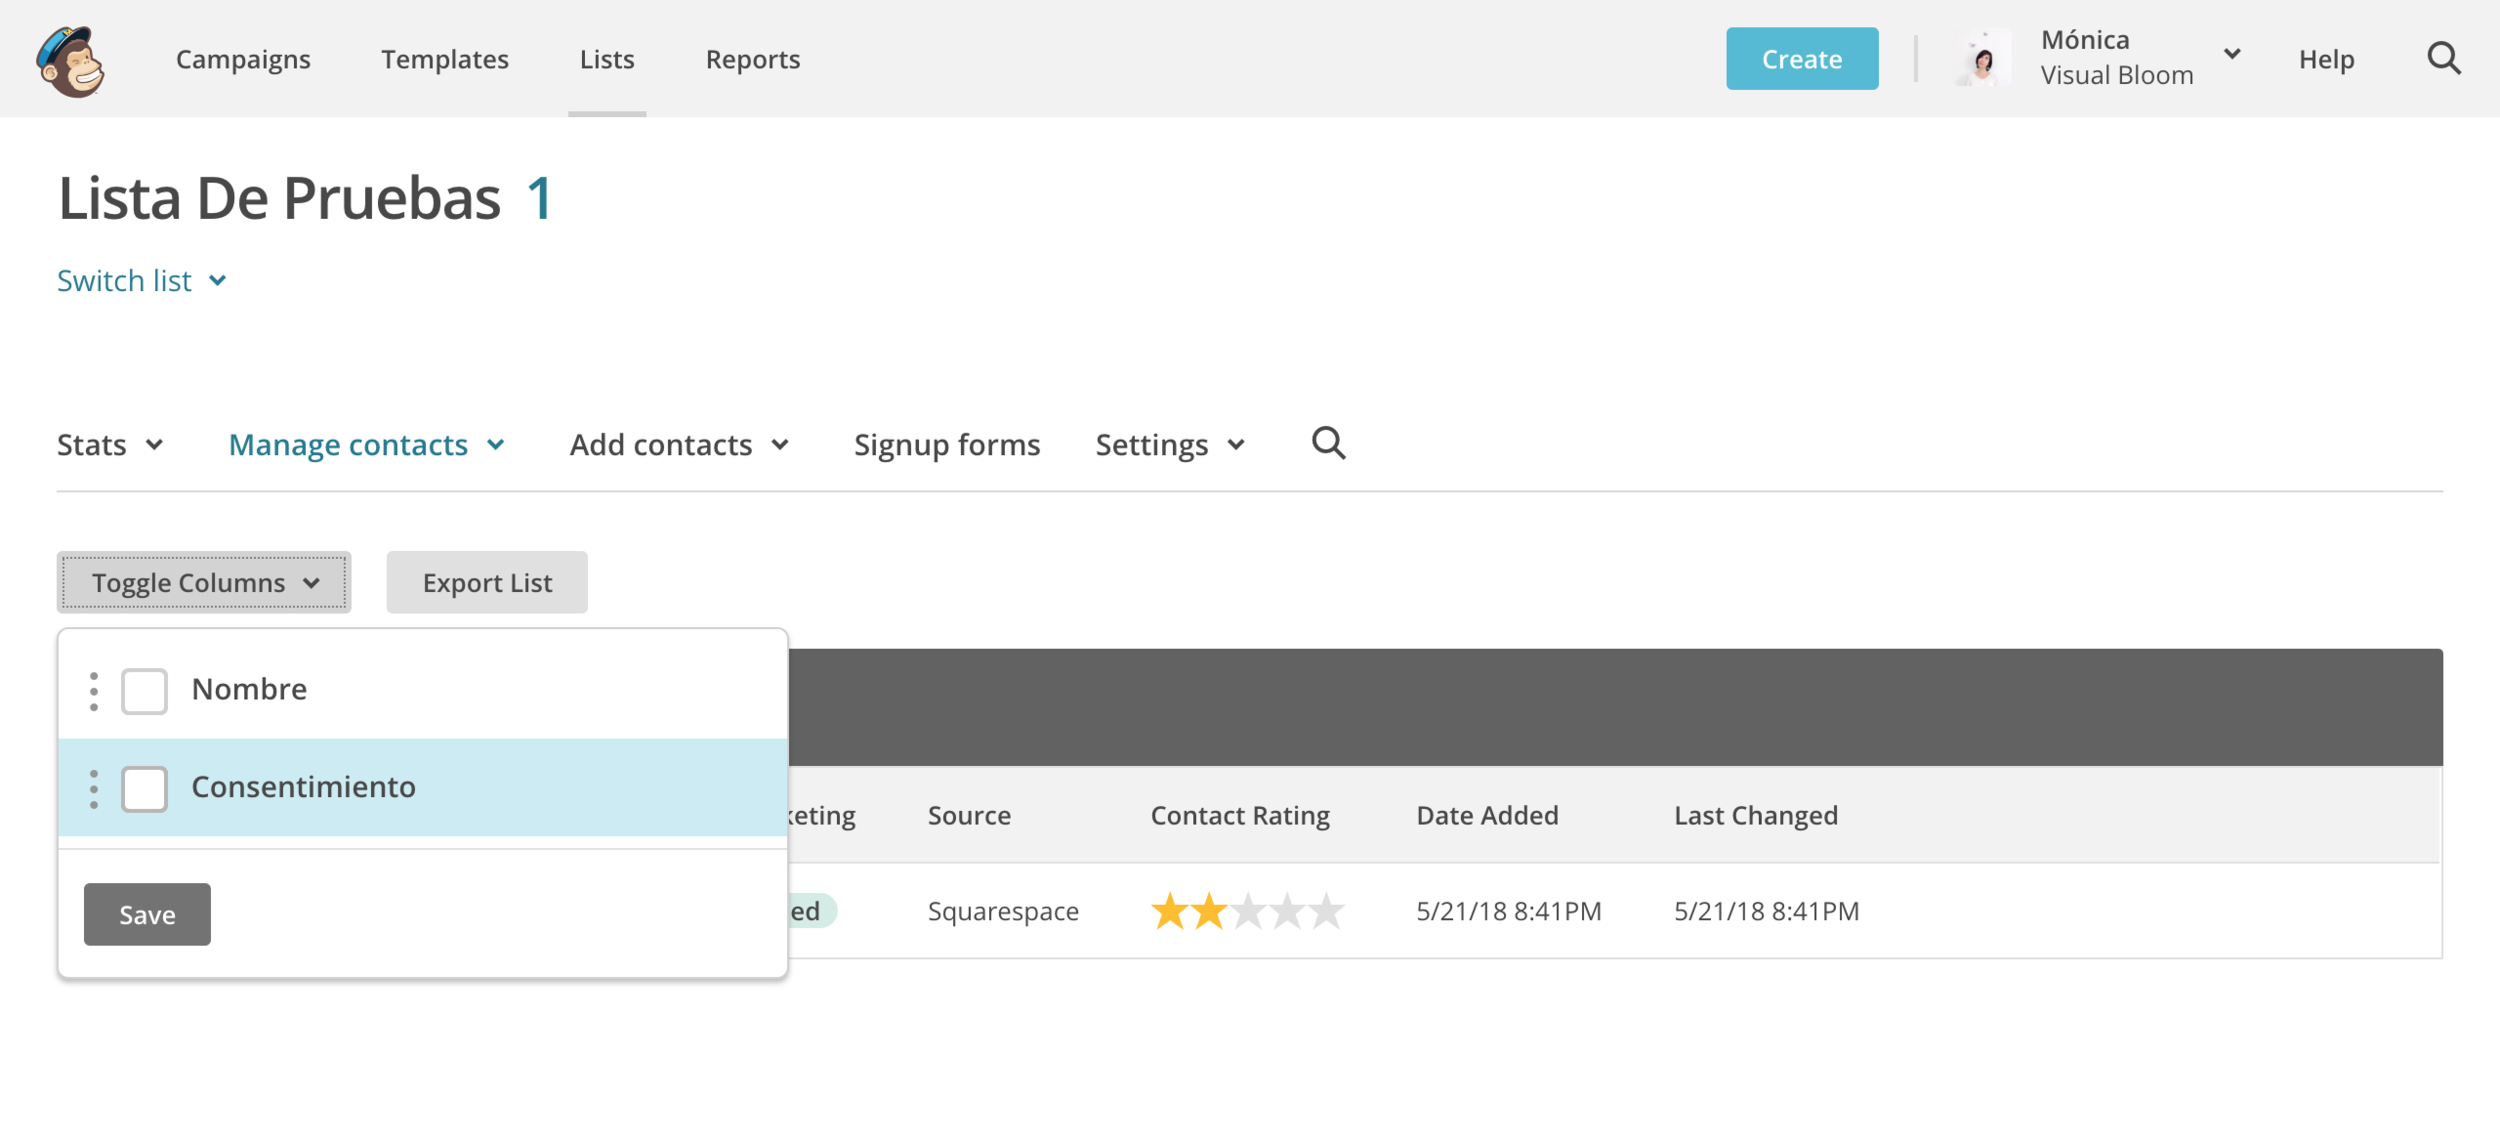
Once you've saved the view, the consent column should appear, displaying the text you entered in the checkbox—in this example, “Yes, I want to subscribe”:

Finally, I just want to mention that the same process I’ve shown you for adding the legal text and the link to the privacy policy to a sign-up form can also be used if you’re creating a contact form, for example… or any type of form, really, as long as you’re using the Squarespace form block.
If you have any questions about how to do this, leave me a comment and I'll get back to you as soon as possible.


![How to Sell Online Courses with Squarespace [Updated for 2024]](https://images.squarespace-cdn.com/content/v1/6788d438405dc03eabea6c99/1737020477911-65DRZUM6E66MDXLHVRT9/cursos-Squarespace.jpg)


