How to Create an Online Store with Squarespace
Although Squarespace is becoming increasingly popular, there is still very little information available in Spanish about the platform in general. If we go a step further and look at information on how to use it for e-commerce, the landscape is even more sparse, so today I’m here to help remedy this situation a bit.
One of the advantages of Squarespace is that you can add an online store to your site without having to sign up for a specific e-commerce plan.
It's true that your store's features vary depending on the plan you use, but if you have a Business plan (which is the plan most sites use), you don't have to pay extra to set up your online store and start selling.
Now more than ever, being able to sell physical or digital products online is essential, and with Squarespace, you get all the benefits of the platform —ease of use, high-quality designs, streamlined management, and more—when it comes to creating and managing an online store.
This post is just a general overview of all of Squarespace's e-commerce features, but I hope it serves as a starting point for setting up your online store.


Table of Contents
1. Choose a template for your online store
If you've already created your website and are looking for ways to enable e-commerce on it, you can skip this section.
On the other hand, if you're building your website and online store from scratch, it's best to start with one of the templates that are already optimized for e-commerce.
Keep in mind that on Squarespace , all templates include the same features, so no matter which one you choose, you’ll be able to set up your online store. The thing is, if you choose the ones that are already e-commerce-ready, you’ll have a bit of work saved.
My recommendation is that you choose the one with the layout or page design that most closely matches what you want for your store, but don't worry too much about colors or fonts because all of that can be changed very easily later on.
If your site is already on version 7.0, you can set up your store without any issues, or consider whether it would be better to upgrade to version 7.1 (if you can afford it, that would be the best option). If you’re using Squarespace 7.0, I’d recommend choosing a template from the e-commerce-specific families (such as Brine or York), because those offer additional features.
You can learn a little more about how Squarespace templates work here: How to Choose a Template for Your Squarespace Website, where I explain the differences between the two versions of Squarespace and their templates.
2. Create your store on Squarespace
If you chose an e-commerce template, you'll see that when you log in to your site, the store will already be set up by default, and you'll also see that it includes some sample products, so you can skip this step.
If you already had a website up and running with a different template or chose one without e-commerce enabled, you'll need to set up your store—but don't worry, it only takes two clicks:
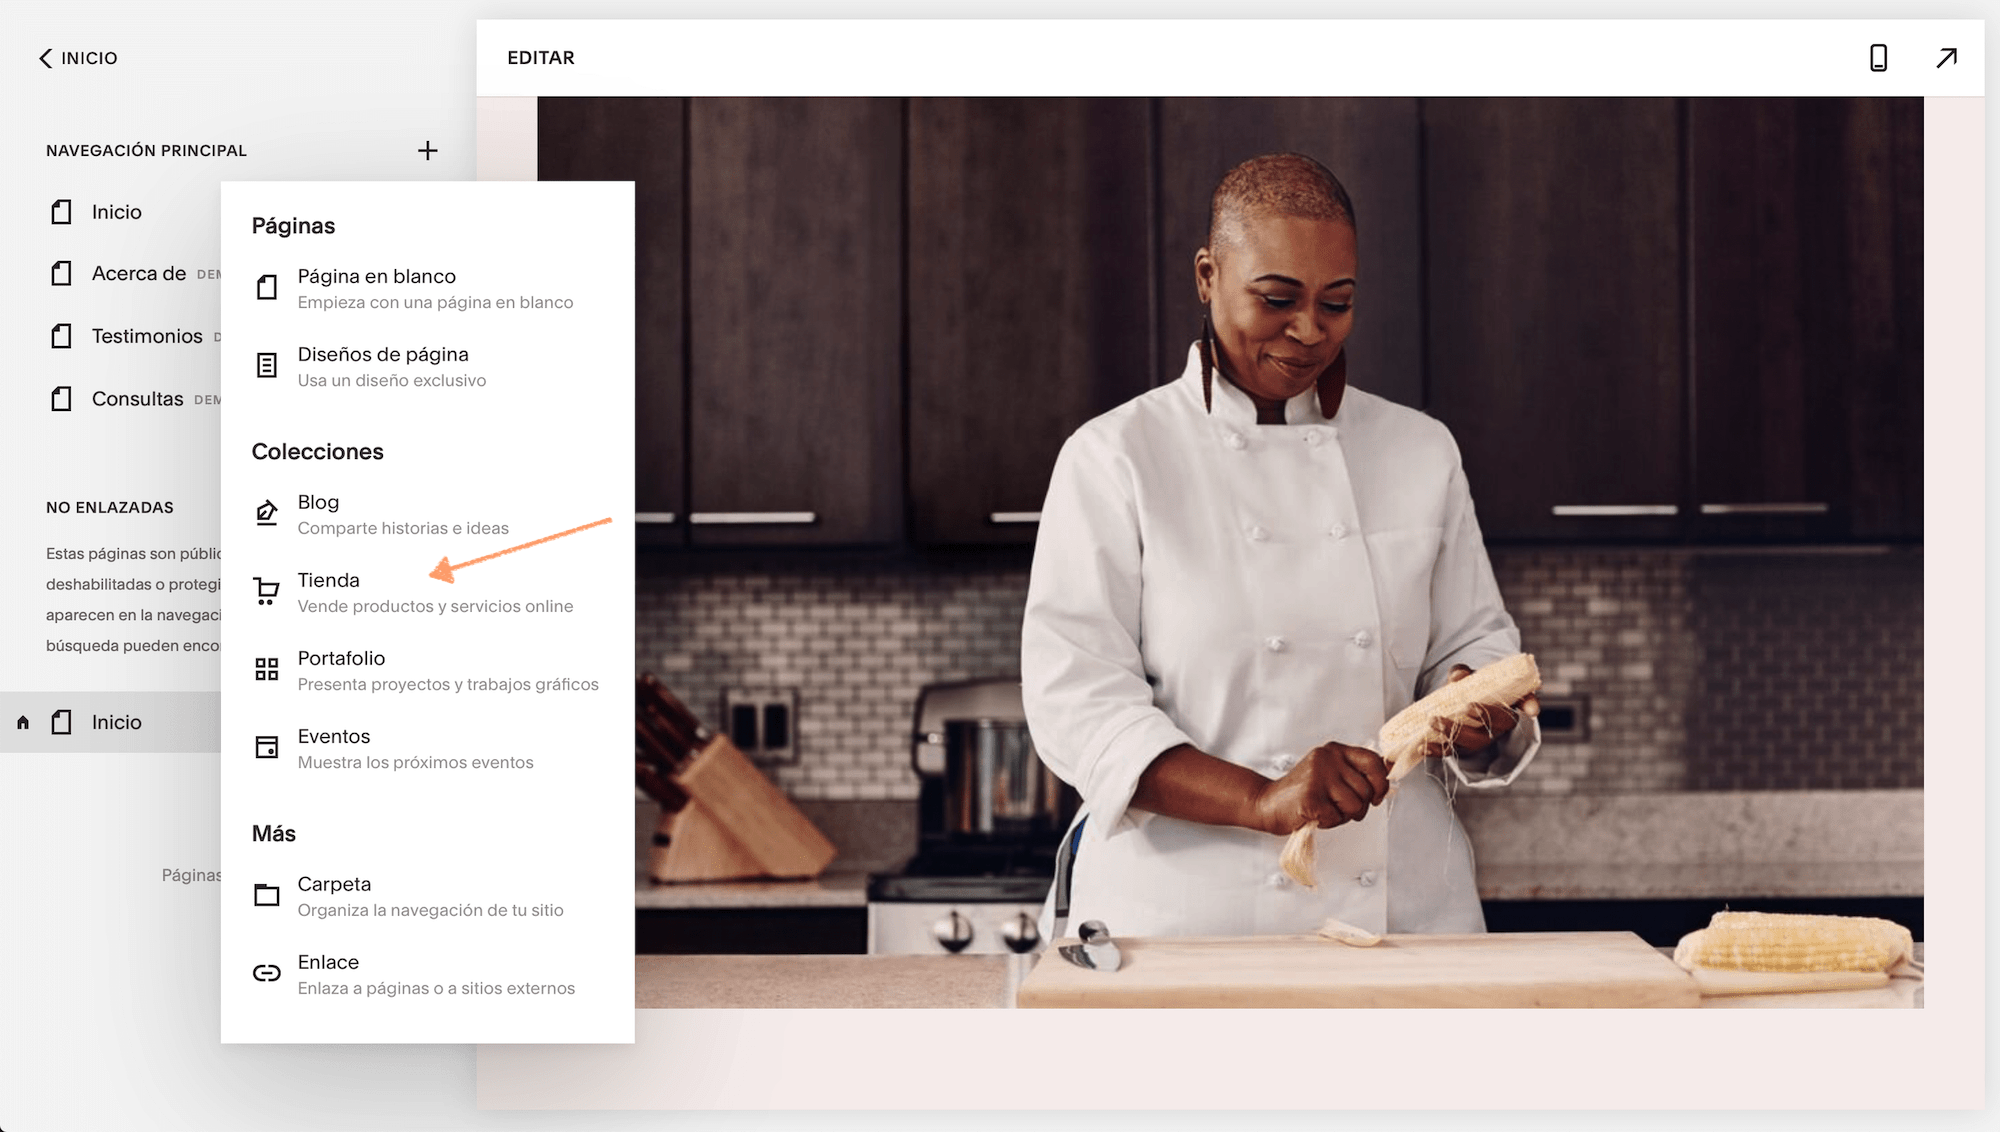
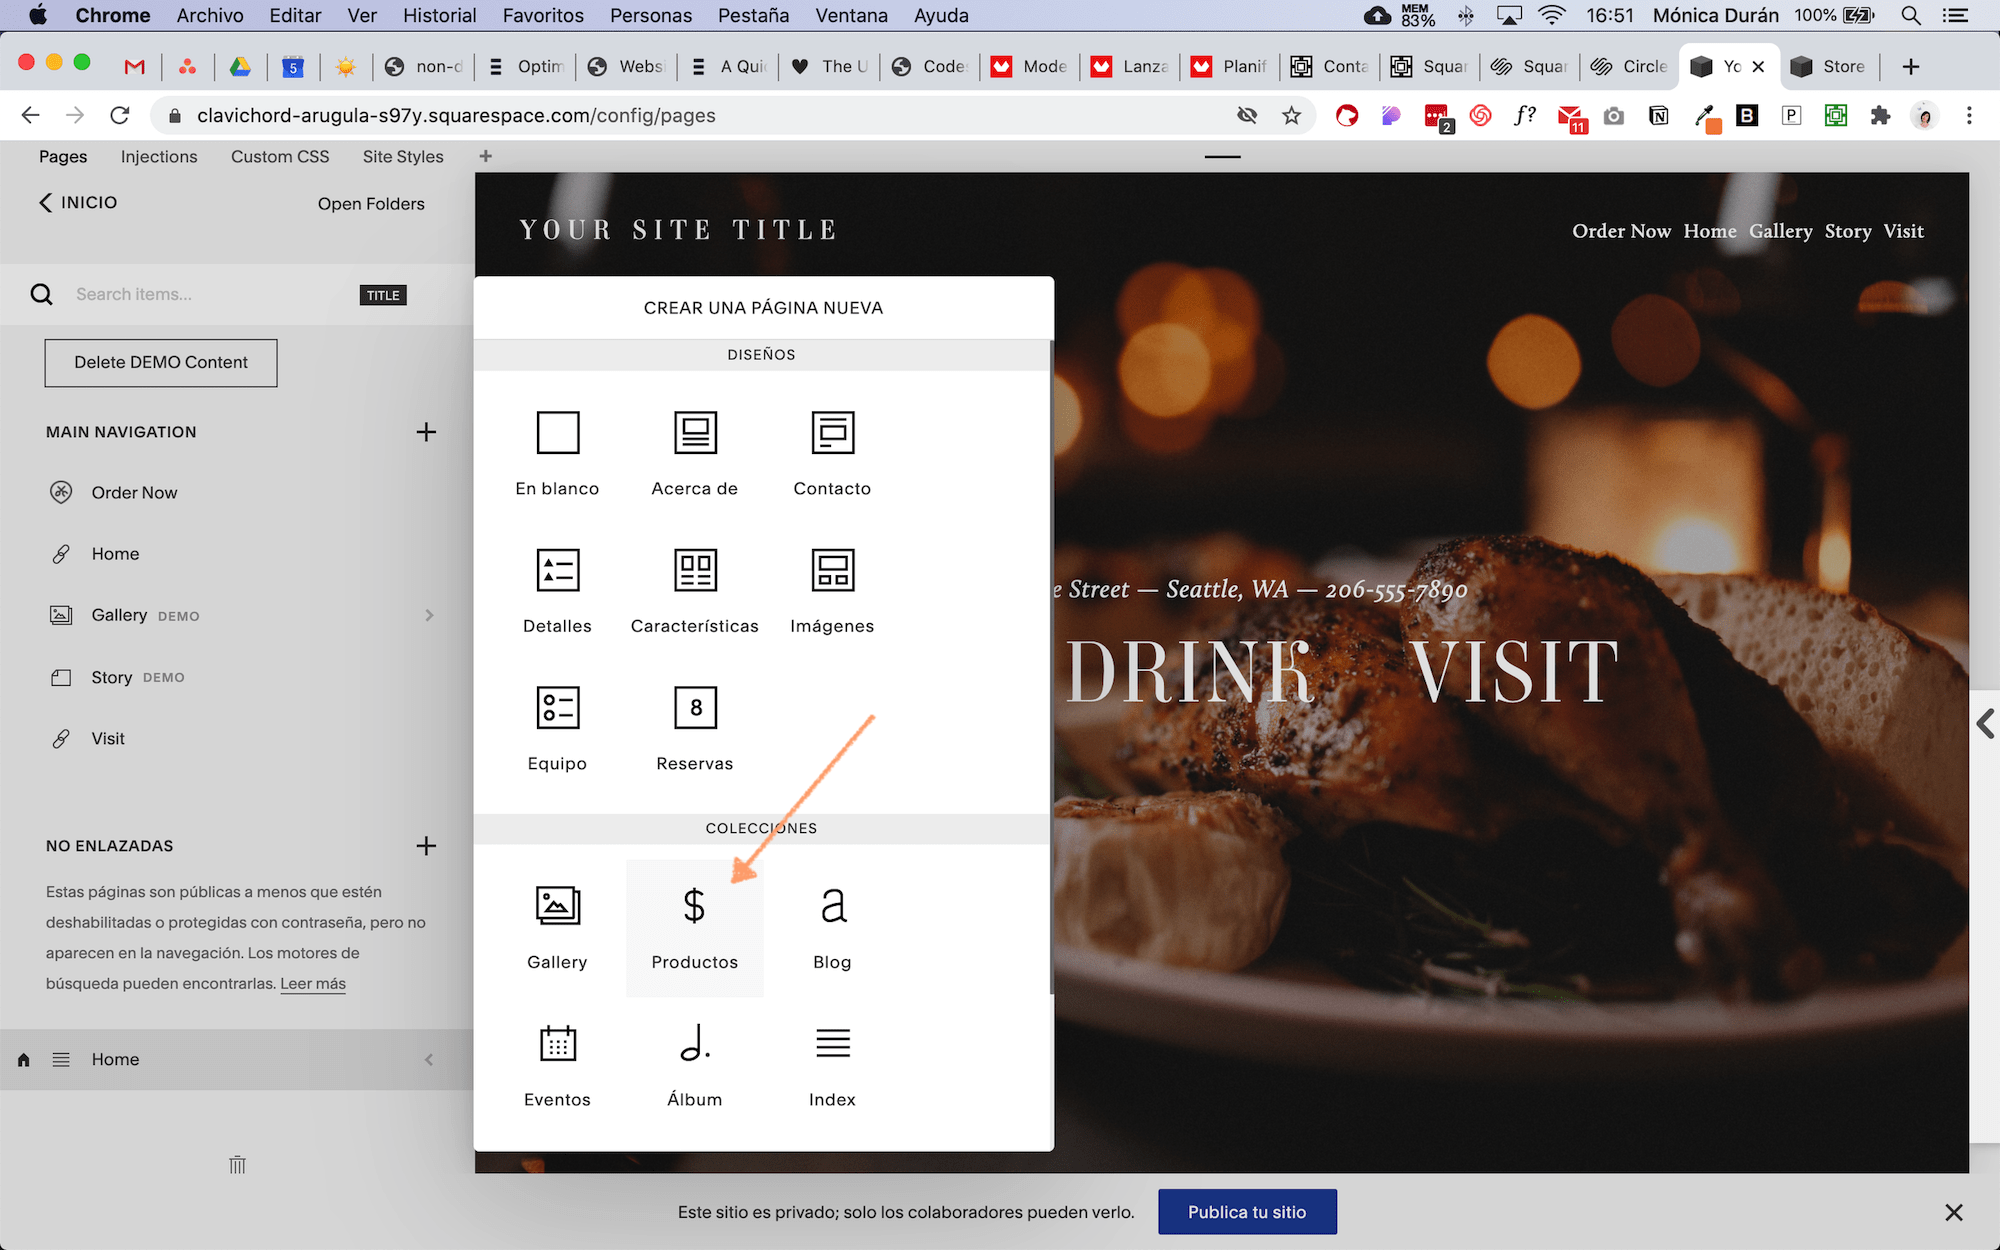
Click the + icon in your "Pages" panel and select "Store."
You'll see a window where you can choose one of two options for your store's page layout, but you can actually choose either one because everything you see can be modified later.
Once you've chosen one of the two options, you'll see that the Store has been added to the Pages panel and already includes several sample products that you can edit.

3. Add products to your online store
With the sample products that Squarespace creates for your new store, you have several options:
If you're going to sell physical products, you can edit them with your own information, or you can delete them and create new products from scratch.
If you're going to sell digital products or services, you'll need to create new products. Why? Because Squarespace has different settings for each type of product.
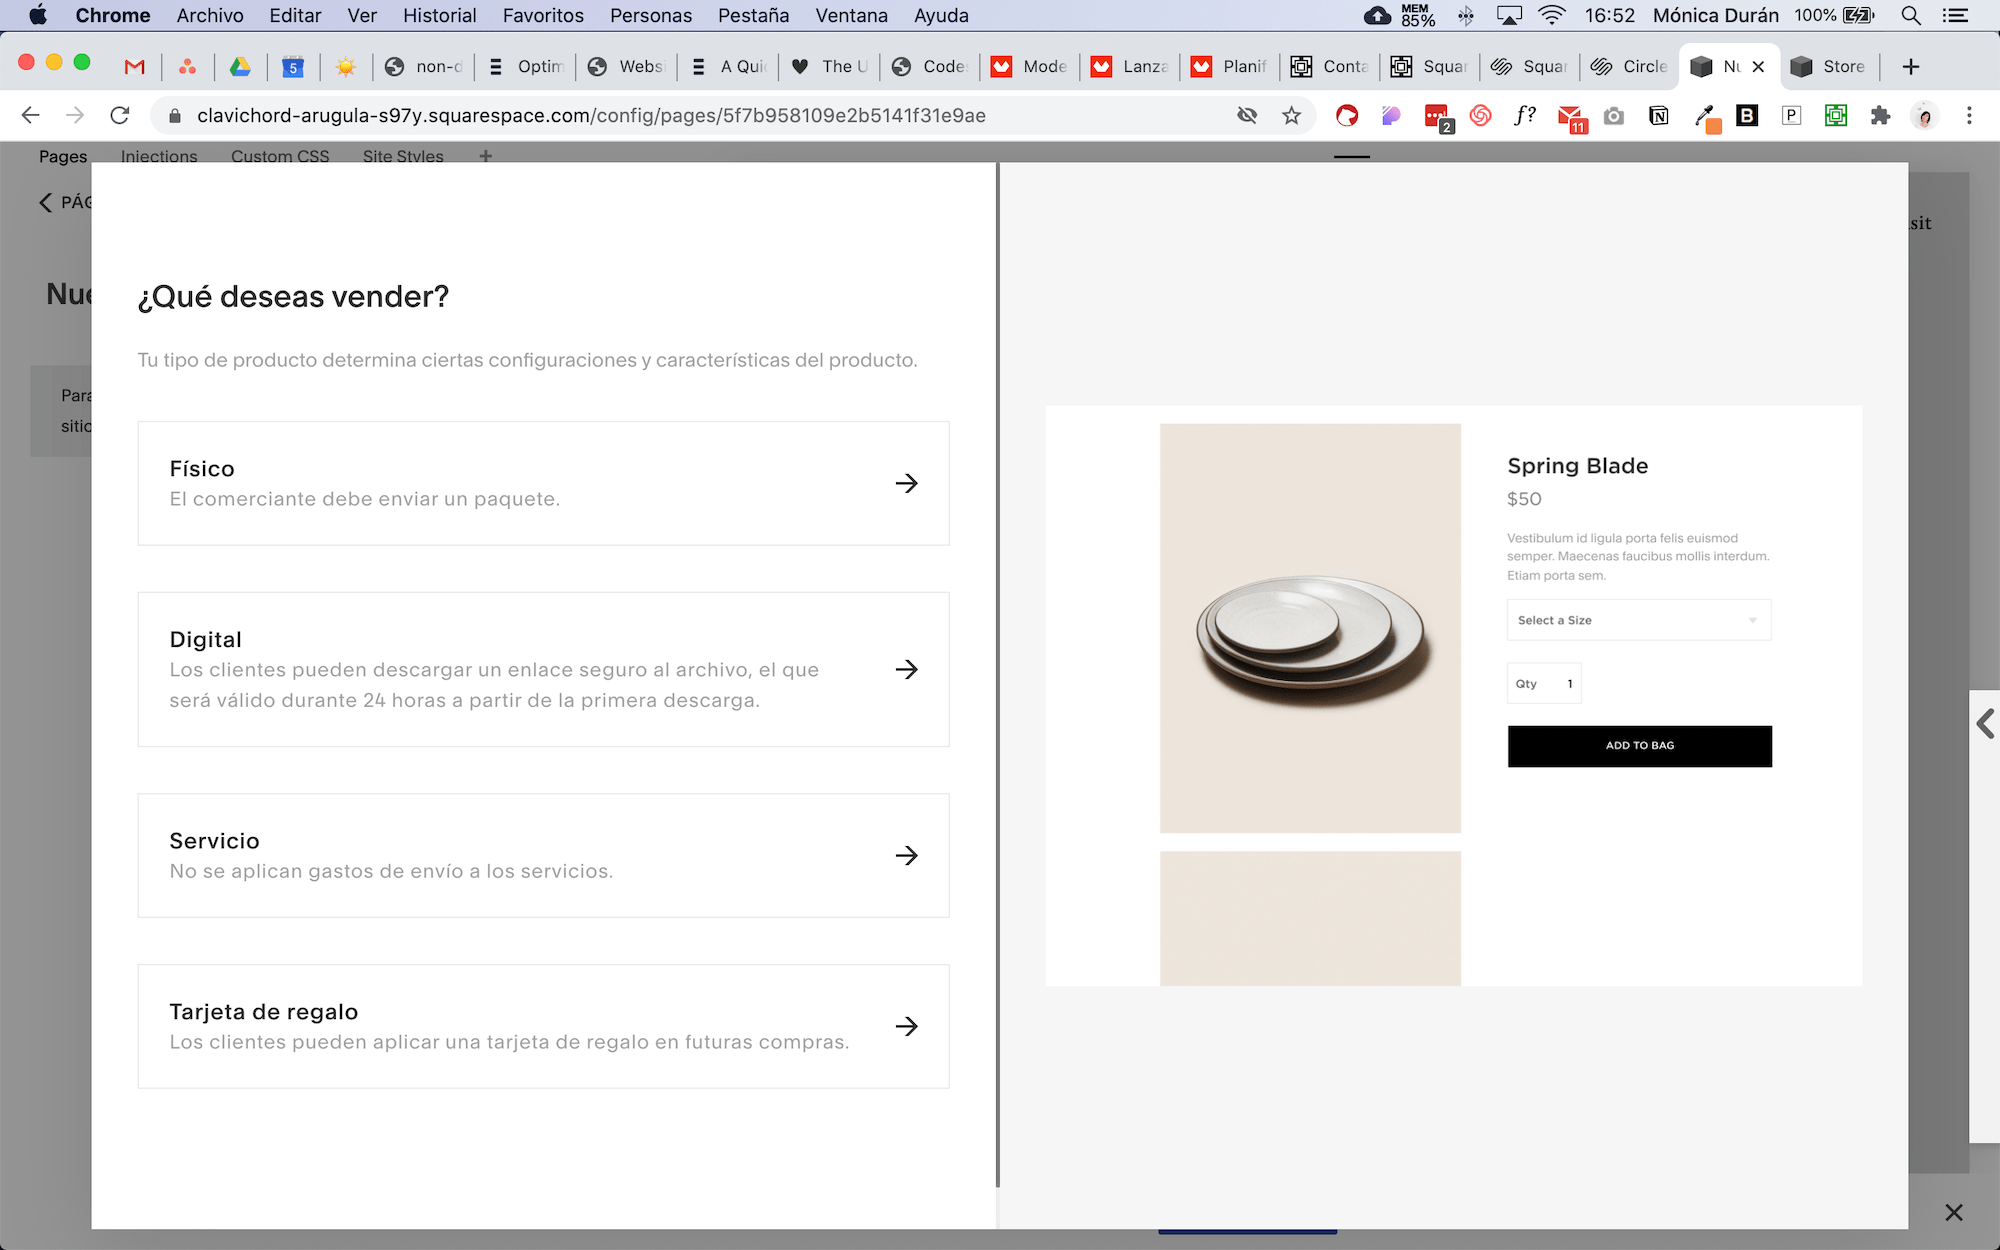
Types of products you can sell on Squarespace
On Squarespace, we can sell four types of products:
Physicists
Digital
Services
Gift cards.
And each one has its own characteristics, which we'll look at in more detail.
Physical products
As the name suggests, these are products that you need to physically ship to your customer; you’ll need to specify their dimensions and weight in the product details so you can set up shipping later.
You can set up physical products to be purchased as a one-time purchase or as a subscription.
Digital products
Once again, the name says it all: these are digital products that your customers can download via a link provided automatically after they’ve made a purchase. Think of e-books, templates, and even online courses (in this case, you’d download a PDF with instructions on how to access the course, for example).
Digital products do not offer a subscription option, so they would be one-time purchases only.
Products and Services
I recommend the "Service" product for webinars or events where you'll be processing a relatively large number of payments.
You can sell these services as a one-time purchase or as a subscription, such as a membership.
On the other hand, if you need to manage schedules, availability, and class sizes (a yoga studio, for example), I recommend using Squarespace’s appointment booking tool, which can be easily integrated with your website.
Gift cards
With this product, you can create gift cards that your customers can purchase to redeem themselves or to give to someone else. Each gift card you sell will have a unique code that is entered at checkout and deducted from the final price.
Gift cards are a special product that recipients can use to pay for orders placed in the online store. Each gift card has a unique code.
How to add products to your online store
Now that you know what types of products are available on Squarespace, let's see how to set them up.
To create a new product:
Click the + icon.
Select the type of product you want to create.
Fill in your product information (primarily the information under the “Product” and “Pricing and Variants” tabs).


To edit an existing product:

Click the three dots to open the options (these dots only appear when you hover over the product).
Select “Edit”.
Update the product information with your own details.
You'll see that, depending on the type of product you create, the information you need to fill out in the tabs varies. For example:
For physical products, you must specify the weight and dimensions.
For digital products, you'll need to upload the digital file you're going to sell.
If you already have a product inventory on another platform like Shopify or Etsy, you can import it into Squarespace and save yourself a lot of work when setting it up, especially if you have a large inventory. Here’s a guide with more information on how to do it.
General recommendations when creating or editing your product information:
Add high-quality images of your product. If you're selling a digital product or a service, you can use graphics or mockups to represent it.
Always include a description, but keep it brief. It will appear next to the image on the product page.
Add categories (you can even nest them) and tags to your products. Especially if you have different types of products, categories will help your store visitors filter through them.
In the “Additional Information” tab, you can add more details about your product using standard Squarespace content blocks, such as videos, instructions, FAQs… basically, you can go into as much detail as you need here.
You should add your product's thumbnail image in the "Options" tab, along with a custom URL.
Don't overlook the SEO tab—it will give your products a better chance of ranking in search engines.
On the "Share" tab, you can enable the option to automatically share your product on the social media platforms connected to your Squarespace website when it's published.
You can publish a product right away, or you can schedule it to be published on a specific date.
Once you've set up all your products, you can move on to the store's general settings in the Commerce dashboard.
4. Configure your online store settings
In the Commerce panel, you'll find a variety of options. As you explore each of these sections, you'll notice that some are only available with Squarespace Commerce plans, but don't worry—there are plenty of options to get started without needing to sign up for one of these plans.
Let's take a general look at what we have here:
General:
Orders, Inventory, and Customers
In these sections, you can view and manage the information generated for each one. You can export the information in .csv format to create regular backups of your store.
Discounts
This is where you can set up different types of discounts. These can include:
automatic or code-based,
as a percentage, free shipping, or a flat rate,
for specific orders or for all orders,
with or without a limit on the number of times the discounts can be used,
and with start and end dates.
Sales tools:
Point of sale
To set up in-person sales (available only in the U.S.).
Product status
To configure product availability.
Waiting lists
Here you can manage the waiting lists you've created.
Related products
Here you can configure which related products are displayed on each product page and based on what criteria.
Notifications
Notifications for customers
This is where we can configure the messages our customers receive for:
Order confirmed
Order completed
Refunded order
Digital downloads
Donation confirmed
Payment declined
Product not available
Depending on whether your site is running version 7.0 or 7.1, this section will look different.
For sites on versions 7.0 and 7.1 created before September 18, 2020: a slightly more basic and complicated message editor, with fewer customization options.
For new sites created in 7.1 after September 18, 2020: a visual editor with many more options for customizing content and design, and a much simpler way to do so.


All sites on version 7.1 will gradually transition to this new editor, so by 2021 they should be using the visual editor.
Low Stock Alerts
This is an internal notification that you can enable so that Squarespace alerts you when there are fewer than X items left in stock; you can specify the quantity yourself.
Settings
Payments
This is where you can connect your payment processor. We currently offer Stripe and PayPal globally, and Square and Apple Pay in the United States.
Alternatively, if you're in Latin America, you can add a Mercado Pago link to your product description, if you prefer. Also, while you can currently set up only one currency in your Squarespace store, you can use the Mercado Pago option (or another payment processor) to offer the option to pay in another currency.
For example, my online store is set up in USD, but the Mercado Pago link allows residents of Mexico to pay in MXN.
Checkout
In this section, you can configure all settings related to the checkout page. You can:
Enable abandoned cart recovery (for Commerce plans).
You can enable the option to add buyers to a mailing list. Currently, you can only add them to Squarespace Email Campaigns or Mailchimp, but if you use a Commerce plan, you can configure alternative options using the Squarespace API to add them to other email marketing platforms.
Various order settings, such as default country, minimum order amount, enabling express checkout, etc.
You can add some additional fields to your checkout form.
You can add the store's sales policies, privacy policy, and terms of use.
And you can customize the information you want to include on the invoices sent to customers.
Customer accounts
Here you can enable the option for customers to create accounts within your store. If you have a small store, this option isn't necessary, but if you have a large inventory or repeat customers, it can be a good choice.
Shipping
Here you can configure everything related to shipping your physical products (remember that digital products and services are delivered via email).
Taxes
In this section, you can add country-specific taxes. These taxes are global, meaning they apply to all products regardless of their type, and this is one area where Squarespace still has a lot of work to do, although they’ve said they’re working on improving it to make the process more automated and better suited to sellers’ needs.
If you're based in the European Union and need to set up sales tax based on the buyer's country and the type of product they're purchasing (especially digital products), the best option right now is to use a tool like Gumroad or SendOwl to set up your products (since these platforms offer more advanced tax options) and embed the payment button on your Squarespace page.


Accounting
In this section, you can download spreadsheets containing your store's financial records for weekly, monthly, quarterly, or annual periods.
Add extra features to your store
Integrate other apps with Squarespace Extensions
Squarespace recently launched Extensions, which are third-party apps that you can integrate with your site to add features and expand the capabilities of your website and online store.
You can access them under Settings > Extensions, and you can integrate accounting apps like QuickBooks and Xero, manage shipping with Shippo, or even set up a dropshipping store with Printful.
There aren't many apps available yet, but they'll be adding more little by little.
Connect your online store's products to Instagram
Instagram is increasingly being used for shopping, and Squarespace has the advantage of offering a tool to link your store to your Instagram account so you can easily add shopping tags to your posts. This integration is only available on Commerce plans, but if you’re a store with a strong presence on Instagram, you might find it very useful.
To set up this option, go to Marketing > Products on Instagram. Keep in mind that you'll first need to link your inventory on Facebook; here's a guide on how to do that.
5. Set up your store's design on Squarespace
The design of the checkout page
The customization options for the checkout page are fairly limited, but this is so that Squarespace can maintain the security of payments. You can change the logo, background colors, and buttons to give it a visual style that aligns with your brand.
You can access these options under Design > Checkout Page.
The design of your store and product pages
When it comes to the design of your store's homepage and product pages, you have many more options for customizing colors, fonts, layout, and more.
You can find these options in different places:
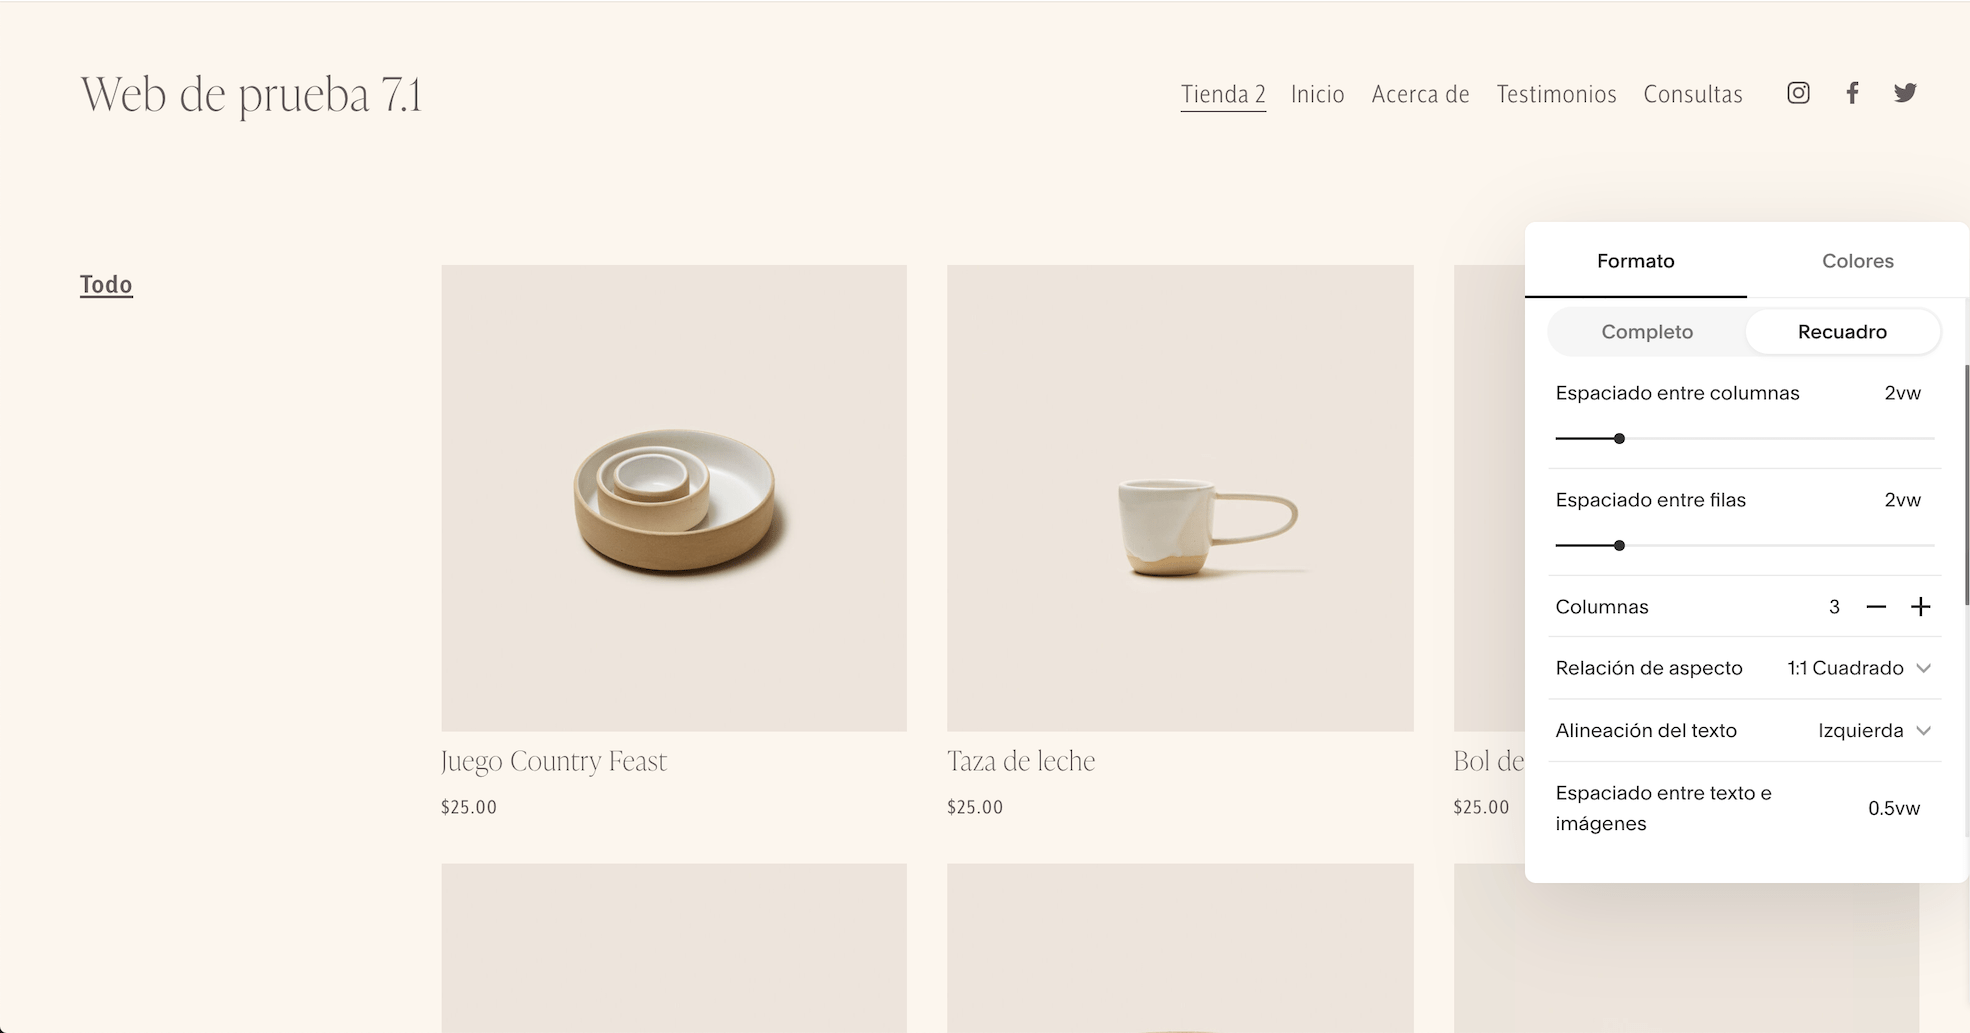
Layout options
You can configure the layout of the store's main page using the options in the section directly within the page editor. Here, you can choose which elements to show or hide, how to arrange the products, and explore other options to create the design you like best or that works best with your products.
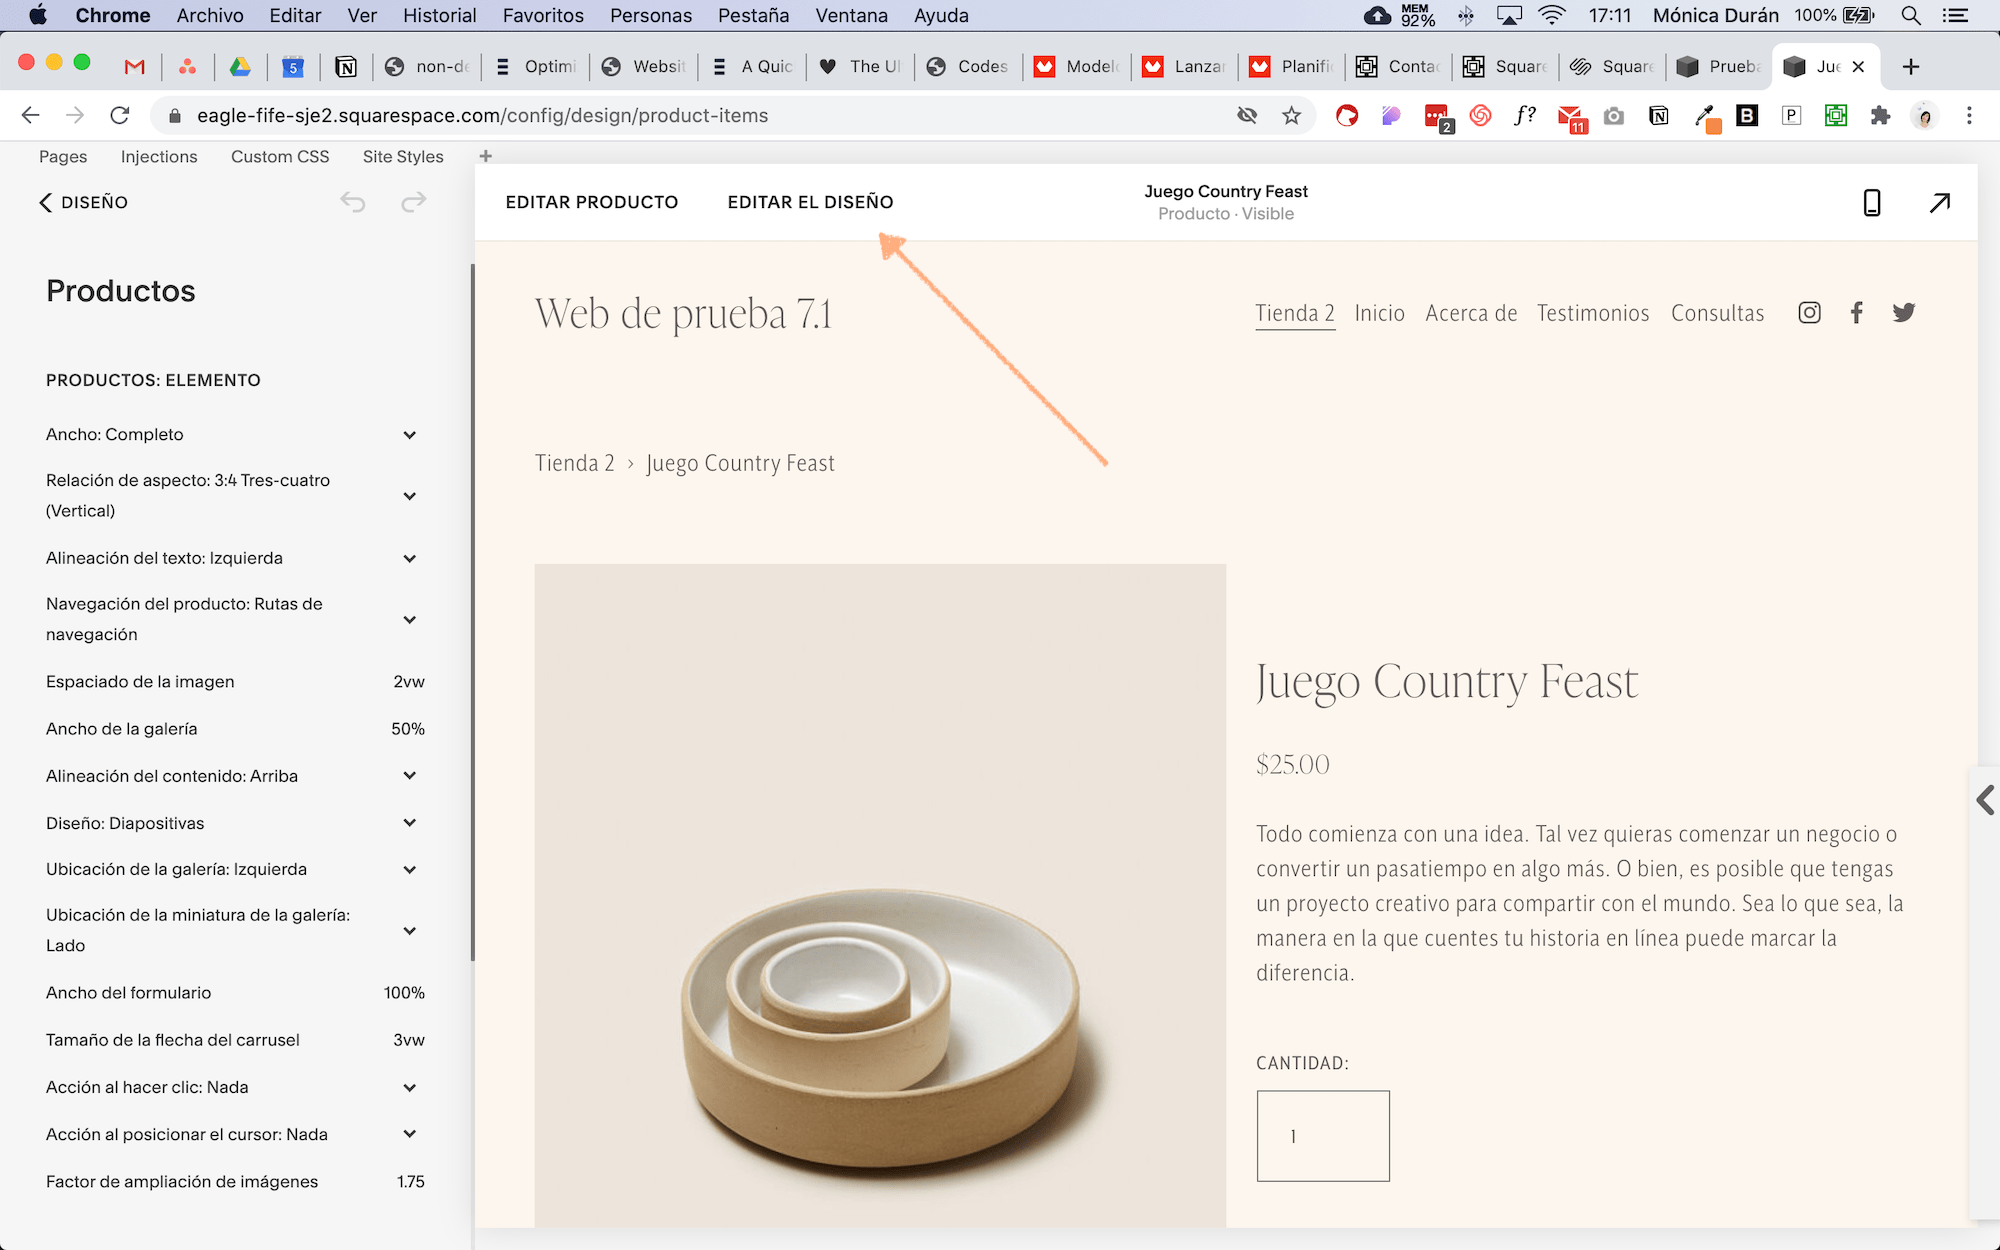
When you go to a product page and click “Edit Design,” a design panel for that specific product page will open, displaying various options you can customize.

Styling options
To change colors, fonts, and backgrounds on both the store page and the product page, go to the Design > Fonts and Design > Colors sections if you're using Squarespace 7.1.

If your store is on Squarespace 7.0, you'll find these settings under Design > Site Styles where all the style options are grouped together in a single panel.
6. Choose the Squarespace plan that's right for you
Squarespace offers four subscription plans:
Staff
Company
Basic Commerce
Advanced Commerce
Of these, the only plan that doesn't include e-commerce is the Personal plan, but as I mentioned at the beginning, you can start with the Business plan without any problem. The main differences between the Business plan and the two Commerce plans are:
With the Business plan, Squarespace charges a 3% commission on each sale, whereas with the Commerce plans, there are no fees. You’ll need to do the math to see which option is best for you, but if you have a lot of sales, you’ll definitely be better off choosing one of the Commerce plans.
The Business plan includes many e-commerce features, but there are advanced features that are only available on the Commerce plans (and some even on the Advanced Commerce plan).
You can view a comparison chart here to see which features are included in each plan, but generally speaking, I would recommend starting with the Business plan and, depending on your sales volume or needs, deciding whether you need to switch to a Commerce plan.
7. Keep track of your store's analytics
One of the things I like most about Squarespace is that it includes a very comprehensive site analytics dashboard for day-to-day use, which is a huge help in tracking what’s working on our site and making changes accordingly.
In addition to general website analytics, if you have an online store, you can view sales statistics from your analytics dashboard. If you’ve also signed up for one of the Commerce plans, you’ll have access to more e-commerce-specific analytics, such as sales by product, website sales funnel analysis, and abandoned cart statistics.
Finally, here are some links to download the Squarespace app so you can manage your website and online store (they’re also available for tablets): for Android, for iOS.
I've also included a link to Squarespace's e-commerce documentation, in case you'd like to take a closer look.
And finally, if you need help with your Squarespace store, I'm here to help.


![How to Sell Online Courses with Squarespace [Updated for 2024]](https://images.squarespace-cdn.com/content/v1/6788d438405dc03eabea6c99/1737020477911-65DRZUM6E66MDXLHVRT9/cursos-Squarespace.jpg)
